Fine Art Photography
M. Plonsky
Biography
Equipment
Galleries
Purchase
Articles
Contact
Compositing Images for Increased
Depth Of Field In Macro Photography
Version 1.11, 12-4-06. © 2003-6 M. Plonsky
Also available in Bosnian from A. Dugalic, Kazakh from A. Kerimova, & Turkish from Z. Solak.
I started shooting macros in 2000 with a point and shoot digital. I remember my disappointment in not being able to fill the screen with th e object I was interested in. So I tried (and continue to have fun with) various ways of filling the frame with very little. As soon as I started doing this, I noticed that the DOF issue was becoming more difficult. The more magnification I used, the less DOF was available. These days I use a dSLR with macro lenses, extension tubes, teleconverters, diopters, lenses reversed on other lenses, lenses reversed on the camera or extension tubes, etc. But, DOF is still something I want more of.
While I seem to have the ability to nail the focus on the eyes of a tiny insect, the results of a single image are often less than satisfying. For example, with a head on shot of a fly, you can get the eyes in focus, but then the nose will be out of focus and vice versa. For side profile portrait of a damsel, you can get either the eye or the face in focus, but not both.
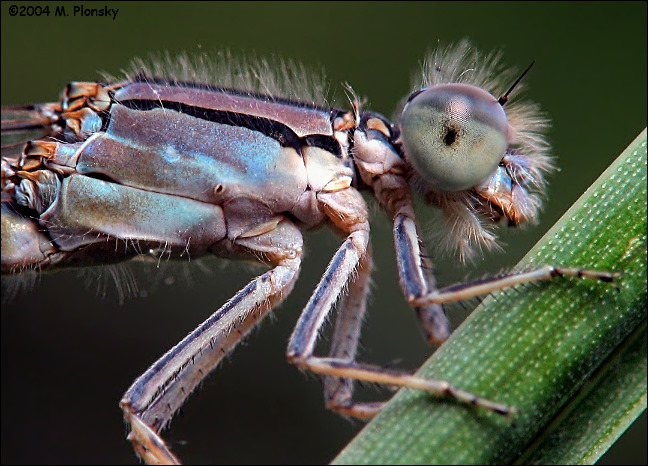 |
the face and body in focus, while the second shot had the eye in focus. |
I had read an article by Fred Miranda where he had combined two exposures of the same scene to gain a better tonal range. This gave me the idea to combine two images of the same scene which differ in the plane of focus in an effort to increase DOF. Each of the images in the gallery that accompanies this article was created in this manner. Although it is not easy to do and requires lots of practice, I am pleased with the technique. If you want more DOF than your camera gives and you’re comfortable in the digital darkroom, give the technique a try.
For the technique to work, you have to keep it in mind when shooting. For example, take a shot of a fly with the eyes in focus and then move the camera back a tad and get the same shot with the nose in focus. While I use Photoshop 7, any high end image editor should work. One image serves as the main image, for example the eyes. Then I carefully select the nose from another frame (usually the next frame I shot). If I am lucky, I might even get a third shot with the portion of the back of the fly behind the eyes in focus.
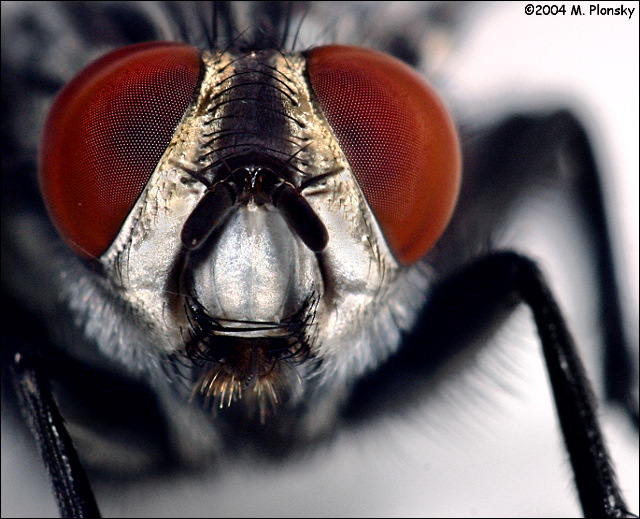 |
the eyes in focus, while the second shot had the nose in focus. |
When selecting the more in focus feature of the critter to add to the main image, I make sure to select more than I need and then feather the selection before copying it and pasting it into the main image. It will be a new layer. It is important that the two frames involved be as identical as possible except for the plain of focus. This is difficult to do considering that the majority of my shots are handheld. Sometimes the feature (e.g., nose) doesn’t fit quite right. You need to reshape it so that it does. This involves subtle adjustments such as skewing and resizing using the transform tool. (If the adjustments are not subtle, the two images are too different for the technique to work well.) After the feature fits nicely, begin to erase the edges so that they blend in to the primary image to the point where no one would notice that two images are involved. This may take some blurring of the edges as well as us e of the patch and cloning tools in various ways. When you are happy with the blending, flatten the image and clean up the edges some more. Then begin to adjust levels, contrast, saturation, sharpness, etc. as you normally would for a digital negative.
 |
the eyes in focus, while the second shot had the nose/mouth in focus. |
Hope you find the idea useful. Have fun!
If you are interested in this technique, Christina Evans has recently written an article at Naturescapes.net